
Setup an High Availability Technitium DNS server cluster at home
- Introduction
- Prerequisites for Technitium DNS
- Technitium installation procedure
- Technitium High Availability setup
Introduction
Technitium DNS Server is a really interesting DNS server that you can use in your homelab. I have gone from pi-hole to AdGuard Home and while I really liked the minimalistic design and footprint of AdGuard Home, it had some issues when creating custom DNS records in a more advanced homelab scenario. The main painpoint for me was terraform integration. While there are both terraform plugins for pihole and AdGuard Home using them gave me stability issues in pihole and never working in AdGuard Home.
After looking for a new solution I found in a Reddit post about Technitium and that it is an open source authoritative as well as recursive DNS server. It can also provide DHCP just like the other solutions.
In this article I am going to install Technitium in a docker container as a primary DNS server (dns01.home.arpa) and on a RaspberryPi as a backup DNS server (dns02.home.arpa). After settting these up, I will enable a cron job on the secondary DNS server to pull and sync the configurations from the primary DNS server periodically to keep them in sync.
This job will take into account that the imported data is then customized on the destinaition Raspberry PI server such as the DNS Server Domain and the DHCP server status. We do not want a second conflicting DHCP server in our local net. I opted to manually enable the DHCP server on the second server in case of primary server failure.
Prerequisites for Technitium DNS
Any recent OS should work. I am focusing on Linux systems in this article. Make sure to install gzip and tar beforehand as the installer script requires these packages.
You can install it as a systemd daemon (on a VM or a Raspberry PI) or run in a docker container with the the provided docker-compose.yml file. To use docker and docker-compose (or podman) you need to install them first (docker-compose install document).
Technitium installation procedure
In this article I am defining a primary server with an IP address 192.168.100.5 and hostname dns01.home.arpa and the secondary server (our Raspberry PI) with an IP address 192.168.100.6 and hostname dns02.home.arpa.
NOTE: This article will not describe how to configure Technitium, rather than get the neccessary information from the GUI, such as the admin API token.
On the docker host
Let’s create a docker-compose.yml file from the suggested git repo. I am using Technitium also as a DHCP server, so I need to configure docker network in host mode. I am using home.arpa domain for the examples.
name: technitium
services:
  dns-server:
    cpu_shares: 50
    container_name: dns-server
    deploy:
      resources:
        limits:
          memory: 512M
    hostname: dns-server
    image: technitium/dns-server:latest
    network_mode: "host"
    restart: unless-stopped
    volumes:
      - type: bind
        source: /local/data/path
        target: /etc/dns
    environment:
      - DNS_SERVER_DOMAIN=dns01.home.arpa
      - DNS_SERVER_ADMIN_PASSWORD=password
and that’s it. Let’s start our service now:
[root@dns01 ]# docker compose up -d
[+] Running 1/1
 ✔ Container dns-server  Started

[root@dns01 ]# netstat -napltu | grep LIST | grep dotnet
tcp        0      0 0.0.0.0:53              0.0.0.0:*               LISTEN      5936/dotnet
tcp6       0      0 :::53                   :::*                    LISTEN      5936/dotnet
tcp6       0      0 :::5380                 :::*                    LISTEN      5936/dotnet
An there you go. Now we can open the Technitium web UI at http://dns01.home.arpa:5380 and continue to configure it from there. This is now run as a daemon, notice the final -d in the command line.
On the Raspberry PI host
First make sure to not use the builtin system-resolved package as it will give you issues staring the server:
sudo systemctl disable systemd-resolved
sudo systemctl stop systemd-resolved
Then follow the official guide to install Technitium. Note: I am installing directly on the OS and not with docker. Basically:
root@dns02.home.arpa:~# curl -sSL https://download.technitium.com/dns/install.sh | sudo bash

===============================
Technitium DNS Server Installer
===============================

Installing ASP.NET Core Runtime...
ASP.NET Core Runtime was installed successfully!

Downloading Technitium DNS Server...
Updating Technitium DNS Server...
Configuring systemd service...

Technitium DNS Server was installed successfully!
Open http://dns02.home.arpa:5380/ to access the web console.

Donate! Make a contribution by becoming a Patron: https://www.patreon.com/technitium
Both servers are now up and running but we are going to configure only the first one and allow the backup and restore procedure through the API to sync the secondary server.
Technitium High Availability setup
API token creation
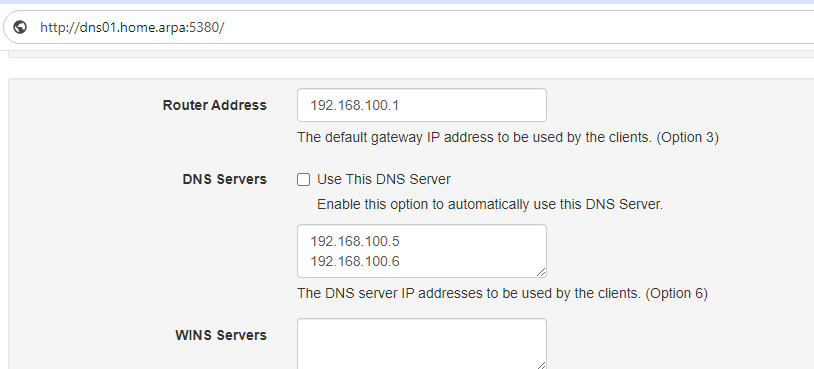
On the first DNS server configure both DNS servers in the DHCP scope as below.
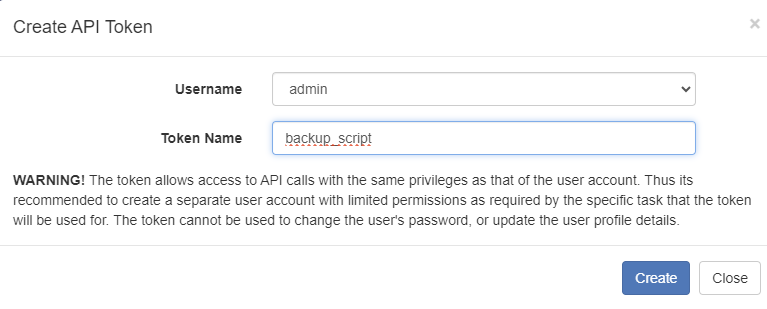
Then create a new API token in Administration -> Sessions -> Create token and after giving a name (eg. backup_script), copy the new token value somewhere safe as we need it for the next steps.
Repeat the same token creation procedure in the secondary DNS server as we need this to restore the backup and do some final customizations on the server as mentioned earlier (rename the server and disable the DHCP server). Save the token somewhere safe as we need it for the backup/restore script below.
Backup job creation
On the secondary server we will need to run a cron job that will parse the backup from the primary server’s API and restore locally.
The script is stored in this gist
I am pasting here the content of the script as of April 2024. Fill out the variables sections as per your environment.
#!/bin/bash

# Author: Besmir Zanaj, 2024
# This is a very raw script to backup configs (no logs and no stats) from a technitium server
# to another
#
# first create two tokens: one on the source server and another one on the destination one
# fill out the vars below
# create a cronjob with this script on the destinaton host
# eg:
# 30 */6 * * * /path-to/technitium-sync.sh

set -euxo pipefail

src_dns_server='source.ip.address'
dst_dns_server='dest.ip.address'
src_dns_serverdomain='fqdn.of.source.server'
dst_dns_serverdomain='fqdn.of.dest.server'
src_dns_token='SOURCE_TECHNITIUM_TOKEN_HERE'
dst_dns_token='DEST_TECHNITIUM_TOKEN_HERE'
backup_file="technitium-backup.zip"


# Check the primary server's health before running the script
echo "Checking primary Technitium server status"
status_code=$(curl --write-out %{http_code} --silent --output /dev/null http://$src_dns_server:5380)

if [[ "$status_code" -ne 200 ]] ; then
  echo "Primary DNS server is not available. Skipping backup"
  exit 1
else
  echo "Getting the backup archive from the primary server"
  curl -s "http://$src_dns_server:5380/api/settings/backup?token=$src_dns_token&blockLists=true&logs=false&scopes=true&stats=false&zones=true&allowedZones=true&blockedZones=true&dnsSettings=true&logSettings=true&authConfig=true&apps=true" -o $backup_file
fi

# restore_backup
echo "Restoring the backup on $HOSTNAME"
curl -s --form file="@$backup_file" "http://$dst_dns_server:5380/api/settings/restore?token=$dst_dns_token&blockLists=true&logs=true&scopes=true&stats=true&apps=true&zones=true&allowedZones=true&blockedZones=true&dnsSettings=true&logSettings=true&deleteExistingFiles=true&authConfig=true"  --output /dev/null

# wait for server to come back
echo "Waiting for 10 seconds for the destination server to start up"
sleep 10

# set dnsServerDomain on destination server
echo "Updating DNS server Domain in destination server"
curl -X POST "http://$dst_dns_server:5380/api/settings/set?token=$dst_dns_token&dnsServerDomain=$dst_dns_serverdomain"

# disable DHCP on the destination server
echo "disabling DHCP in destination server"
curl -X POST "http://$dst_dns_server:5380/api/dhcp/scopes/disable?token=$dst_dns_token&name=local-home"

# cleanup
echo "Cleaning up temporary files"
rm -rf $backup_file
Backup job scheduling
On the destination server create a cron job to periodically sync the backup so that any updates (eg. new DNS records) on the primary are reflected on the secondary DNS server. In the example below the DNS servers are synced every 12 hrs.
dns02$ crontab -l | grep sync
00 */12 * * * /root/technitium-sync.sh
Now our servers are synced and configured with high availability for our local network.