Build a RKE2 kubernetes cluster with Longhorn and Rancher
Introduction
I finally got my CKA Certificate and out of curiosity started deploy not only vanilla k8s clusters with kubeadm but also other kubernets flavors. One of these is the RKE2 kubernetes distribution.
I found several sources to install RKE2 and after reviewing them I think the official quickstart documentation is pretty straightforward. Here I am writing a step-by-step how-to tutorial to build a new RKE2 kubernetes cluster, manage it with Ranger and use Longhorn as a storage provider on Ubuntu Linux 22.04.01 LTS servers.
Recap of the tools we are going to install:
- RKE2 - Security focused Kubernetes
- Rancher - Multi-Cluster Kubernetes Management
- Longhorn - Unified storage layer
Prerequisites
Get 3-4 Linux servers from anywhere (DigitalOcean, local Proxmox/VMWare, AWS, etc.) and ensure you have ssh and root access on the nodes.
In this article I am using 4 Linux Ubuntu 22.04 LTS servers with specifications shown in the table below. Note: I am using much more RAM than needed as I am using my own homelab Proxmox server.
Another requisite is to have a DNS A record resolving to the control-plane node so that we can reach the Rancher web interface through an ingress. I am going to use rancher.cloud.albania for this purpose. We are going to use node k8sc1 as the control-plane.
| name | ip | memory | core | disk | os | role |
|---|---|---|---|---|---|---|
| k8sc1 | 192.168.88.87 | 16Gb | 4 | 30 | Ubuntu 22.04.1 LTS x64 | control-plane |
| k8sc2 | 192.168.88.88 | 16Gb | 4 | 30 | Ubuntu 22.04.1 LTS x64 | worker node |
| k8sc3 | 192.168.88.89 | 16Gb | 4 | 30 | Ubuntu 22.04.1 LTS x64 | worker node |
| k8sc4 | 192.168.88.90 | 16Gb | 4 | 30 | Ubuntu 22.04.1 LTS x64 | worker node |
 $ for i in {1..4};do host k8sc$i; done
k8sc1 has address 192.168.88.87
k8sc2 has address 192.168.88.88
k8sc3 has address 192.168.88.89
k8sc4 has address 192.168.88.90

# rancher FQDN
$ host rancher.cloud.albania
rancher.cloud.albania has address 192.168.88.87
Prepare the nodes
Run on all nodes the following as root.
$ sudo -i
$ apt update
$ apt upgrade -y
Also make sure to have these firewall ports open for either inter-cluster commmunication and also to allow outside reachability for the services. Some of the ports that k8s uses are also documented here.
$ ufw allow 22/tcp # SSH
$ ufw allow 53/tcp # DNS
$ ufw allow 53/udp # DNS
$ ufw allow 80/tcp # HTTP clients
$ ufw allow 80/udp # HTTPS Clients
$ ufw allow 179/tcp # if we're using BGP peering in calico or metallb
$ ufw allow 443/tcp # HTTPS Clients
$ ufw allow 443/udp # HTTPS Clients
$ ufw allow 8080/tcp # Generic alternative HTTP serving port
$ ufw allow 8443/tcp # Generic alternative HTTPS serving port
$ ufw allow 2379:2380/tcp # Etcd
$ ufw allow 6443/tcp # k8s api
$ ufw allow 7946/tcp # optional if using metallb
$ ufw allow 7946/udp # optional if using metallb
$ ufw allow 8472/udp # optional if flannel overlay network - vxlan backend
$ ufw allow 9153/tcp # CoreDNS
$ ufw allow 9153/udp # CoreDNS
$ ufw allow 9402/tcp # CertMAnager port
$ ufw allow 10250:10255/tcp # Kubelet port
$ ufw allow 30000:32767/tcp # allow nodeports
# finally configure the firewall for the RKE2 service
$ ufw allow 9345/tcp # RKE2 listen port

$ ufw --force enable
Installing RKE2
Since RKE2 does not provide a DEB repository, we are going to use their scripted method. On the master node, k8sc1, login as root and run the following commands. These might take some time to complete as RKE2 will have to download all needed control-plane container images from internet. RKE2 has a full list of install options that you can further customize your ncluster config.
# Get and run the installer script
curl -sfL https://get.rke2.io | INSTALL_RKE2_TYPE=server sh -

# Start and enable the rke2-server.service
systemctl enable --now rke2-server.service
And that is it. We have a new kubernetes cluster up and running (yes a one node kubernetes cluster 😀 ). Verify the service is up and running before proceeding on the next steps.
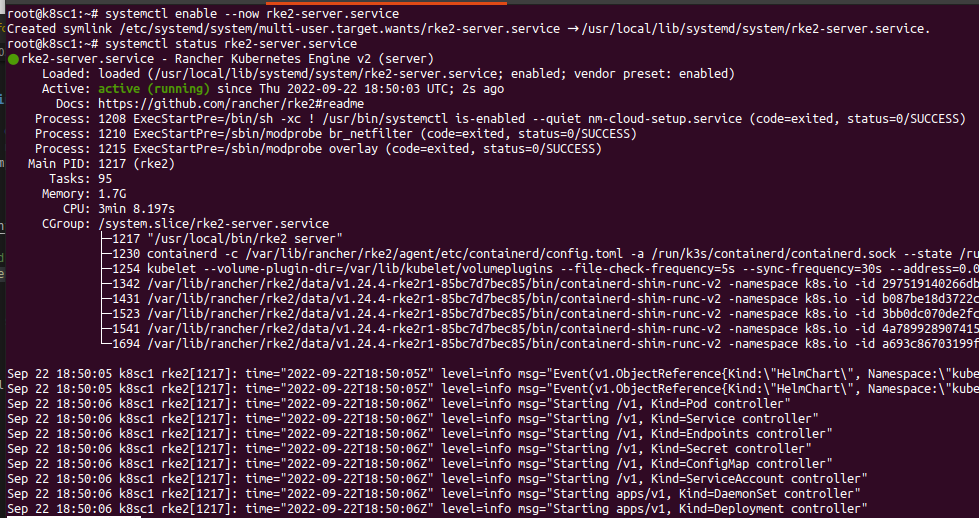
$ systemctl status rke2-server.service
You should have something like this for the install

And this for the service startup
Using Kubernetes
Now we can start interfacing ourselves to the newly built kubernetes cluster. I am going to still run the commands as root on the control-plane node for now.
# lets create a symlink for kubectl just in case the PATH has not been updated
$ ln -s $(find /var/lib/rancher/rke2/data/ -name kubectl) /usr/local/bin/kubectl

# Add the new KUBECONFIG file.
$ mkdir ~/.kube
$ cp -a /etc/rancher/rke2/rke2.yaml ~/.kube/config

# check if we can communicate with the cluster
$ kubectl get nodes
NAME    STATUS   ROLES                       AGE     VERSION
k8sc1   Ready    control-plane,etcd,master   7m14s   v1.24.4+rke2r1
Note: If we want to manage the cluster from our workstation then we need to copy the /etc/rancher/rke2/rke2.yaml file to our $HOME/.kube/config and then edit the server variable from the default one to the IP of the control-plane server. In this case I need to change to the IP address of my k8sc1 node:
# from this
server: https://127.0.0.1:6443

# to this
server: https://192.168.88.87:6443
Next we need to get the node-token for joining the rest of the nodes in the cluster. The node-token is stored at /var/lib/rancher/rke2/server/node-token
Agent nodes installation
The RKE2 agent mode installation on the nodes is similar to the control nodes one. We will need two more things before we start the RKE2 service: a config file to tell the node which server is the control-plane and the join TOKEN itself.
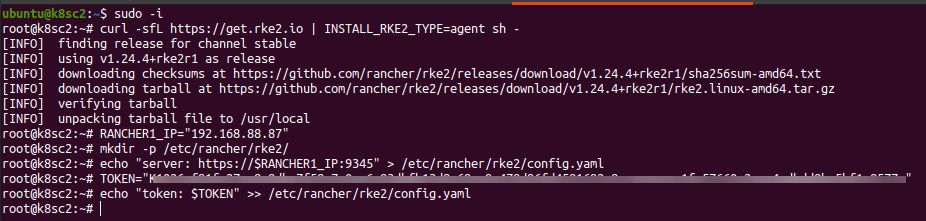
# worker nodes are added with INSTALL_RKE2_TYPE=agent
curl -sfL https://get.rke2.io | INSTALL_RKE2_TYPE=agent sh -
# lets create config file
$ RANCHER1_IP="192.168.88.87" # replace with your IP
$ mkdir -p /etc/rancher/rke2/
$ echo "server: https://$RANCHER1_IP:9345" > /etc/rancher/rke2/config.yaml
# Get the TOKEN from the master node at /var/lib/rancher/rke2/server/node-token
$ TOKEN="LONG_STRING::server:ANOTHER_STRING" # replace accordingly
$ echo "token: $TOKEN" >> /etc/rancher/rke2/config.yaml
# enable and start the rke2 service
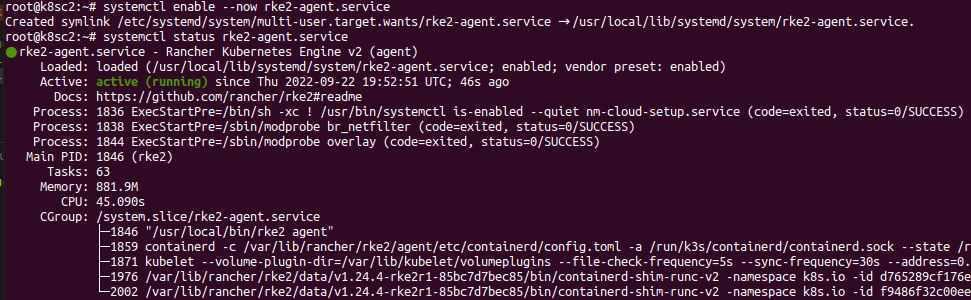
$ systemctl enable --now rke2-agent.service
$ systemctl status rke2-agent.service
The install part should look like this
And the confirmation of the service to be running:
Repeat now these steps for the rest of the nodes. At the end you should have a view like this
$ kubectl get nodes -o wide
NAME    STATUS   ROLES                       AGE     VERSION          INTERNAL-IP     EXTERNAL-IP   OS-IMAGE             KERNEL-VERSION      CONTAINER-RUNTIME
k8sc1   Ready    control-plane,etcd,master   73m     v1.24.4+rke2r1   192.168.88.87   <none>        Ubuntu 22.04.1 LTS   5.15.0-48-generic   containerd://1.6.6-k3s1
k8sc2   Ready    <none>                      10m     v1.24.4+rke2r1   192.168.88.88   <none>        Ubuntu 22.04.1 LTS   5.15.0-48-generic   containerd://1.6.6-k3s1
k8sc3   Ready    <none>                      4m8s    v1.24.4+rke2r1   192.168.88.89   <none>        Ubuntu 22.04.1 LTS   5.15.0-48-generic   containerd://1.6.6-k3s1
k8sc4   Ready    <none>                      2m52s   v1.24.4+rke2r1   192.168.88.90   <none>        Ubuntu 22.04.1 LTS   5.15.0-48-generic   containerd://1.6.6-k3s1
Rancher
We are going to use the latest Rancher version. Information on the releases is in the Rancher Support Matrix.
Rancher installation
In order to install the rest of the featues, including Rancher, we will need Helm for package install. Official install docs are here.
# On the control plane node as root, add helm
$ curl -#L https://raw.githubusercontent.com/helm/helm/main/scripts/get-helm-3 | bash

# add needed helm repo charts
$ helm repo add rancher-latest https://releases.rancher.com/server-charts/latest
$ helm repo add jetstack https://charts.jetstack.io
Now lets start installing the Rancher elements. Note: Cert-Manager is used to generate the self singing TLS certificates. When runnig the helm chart install for Rancher, use the FQDN we set above for the hostname variable, in this case rancher.cloud.albania.
Notice from this example I am using an admin password of AVeryD1fficulP@@ssword for the rancher interface, please change accordingly.
Let’s start. On the control plane node as root, add the cert-manager CRD. This is needed so that when we install the helm chart we avoid the chicken/egg problen of certificate generation.
$ kubectl apply -f https://github.com/cert-manager/cert-manager/releases/download/v1.9.1/cert-manager.crds.yaml

customresourcedefinition.apiextensions.k8s.io/certificaterequests.cert-manager.io created
customresourcedefinition.apiextensions.k8s.io/certificates.cert-manager.io created
customresourcedefinition.apiextensions.k8s.io/challenges.acme.cert-manager.io created
customresourcedefinition.apiextensions.k8s.io/clusterissuers.cert-manager.io created
customresourcedefinition.apiextensions.k8s.io/issuers.cert-manager.io created
customresourcedefinition.apiextensions.k8s.io/orders.acme.cert-manager.io created
Now let’s install the cert-manager helm chart.
$ helm upgrade -i cert-manager jetstack/cert-manager --namespace cert-manager --create-namespace

Release "cert-manager" does not exist. Installing it now.
NAME: cert-manager
LAST DEPLOYED: Thu Sep 22 20:14:55 2022
NAMESPACE: cert-manager
STATUS: deployed
REVISION: 1
TEST SUITE: None
NOTES:
cert-manager v1.9.1 has been deployed successfully!

In order to begin issuing certificates, you will need to set up a ClusterIssuer
or Issuer resource (for example, by creating a 'letsencrypt-staging' issuer).

More information on the different types of issuers and how to configure them
can be found in our documentation:

https://cert-manager.io/docs/configuration/

For information on how to configure cert-manager to automatically provision
Certificates for Ingress resources, take a look at the `ingress-shim`
documentation:

https://cert-manager.io/docs/usage/ingress/
Finally now we can install Rancher with helm
$ helm upgrade -i rancher rancher-latest/rancher \
      --create-namespace --namespace cattle-system \
      --set hostname="rancher.cloud.albania" \
      --set bootstrapPassword="AVeryD1fficulP@@ssword" \
      --set replicas=1

Release "rancher" does not exist. Installing it now.
NAME: rancher
LAST DEPLOYED: Thu Sep 22 20:20:51 2022
NAMESPACE: cattle-system
STATUS: deployed
REVISION: 1
TEST SUITE: None
NOTES:
Rancher Server has been installed.

NOTE: Rancher may take several minutes to fully initialize. Please standby while Certificates are being issued, Containers are started and the Ingress rule comes up.

Check out our docs at https://rancher.com/docs/

If you provided your own bootstrap password during installation, browse to https://rancher.cloud.albania to get started.

If this is the first time you installed Rancher, get started by running this command and clicking the URL it generates:

echo https://rancher.cloud.albania/dashboard/?setup=$(kubectl get secret --namespace cattle-system bootstrap-secret -o go-template='{{.data.bootstrapPassword|base64decode}}')

To get just the bootstrap password on its own, run:

kubectl get secret --namespace cattle-system bootstrap-secret -o go-template='{{.data.bootstrapPassword|base64decode}}{{ "\n" }}'


Happy Containering!
Rancher is now up and ready to be used
$ curl -kI https://rancher.cloud.albania

HTTP/2 200
date: Sat, 08 Oct 2022 09:37:01 GMT
content-type: application/json
cache-control: no-cache, no-store, must-revalidate
expires: Wed 24 Feb 1982 18:42:00 GMT
x-api-cattle-auth: false
x-api-schemas: https://rancher.cloud.albania/meta/schemas
x-content-type-options: nosniff
strict-transport-security: max-age=15724800; includeSubDomains
Accessing the Rancher GUI
Now that the kubernetes cluster and Rancher are up and running, we can access the web GUI at https://rancher.cloud.albania and login with the password we set above. We can do this since the helm chart installed an Ingress for us that forwards the requests for https://rancher.cloud.albania to the Rancher Service in the cattle-system namespace. Here is the Rancher ingress and service for visibility.
$ kubectl get ingress -n cattle-system rancher -o yaml
apiVersion: networking.k8s.io/v1
kind: Ingress
metadata:
...
  name: rancher
  namespace: cattle-system
spec:
  rules:
  - host: rancher.cloud.albania
    http:
      paths:
      - backend:
          service:
            name: rancher
            port:
              number: 80
        pathType: ImplementationSpecific
  tls:
  - hosts:
    - rancher.cloud.albania
    secretName: tls-rancher-ingress
The Rancher service:
$ kubectl -n cattle-system get svc rancher -o yaml
apiVersion: v1
kind: Service
metadata:
...
  name: rancher
  namespace: cattle-system
spec:
  ports:
  - name: http
    port: 80
    protocol: TCP
    targetPort: 80
  - name: https-internal
    port: 443
    protocol: TCP
    targetPort: 444
...
  type: ClusterIP
The Rancher main screen when accessing for the first time.
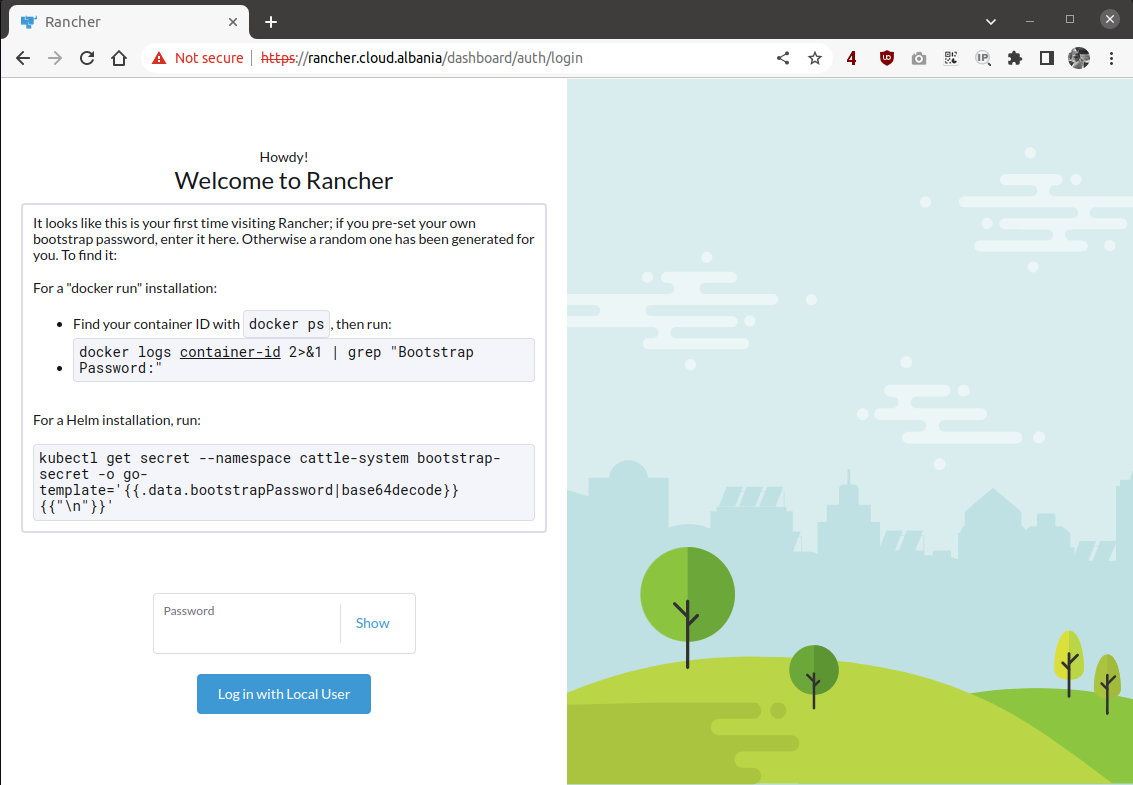
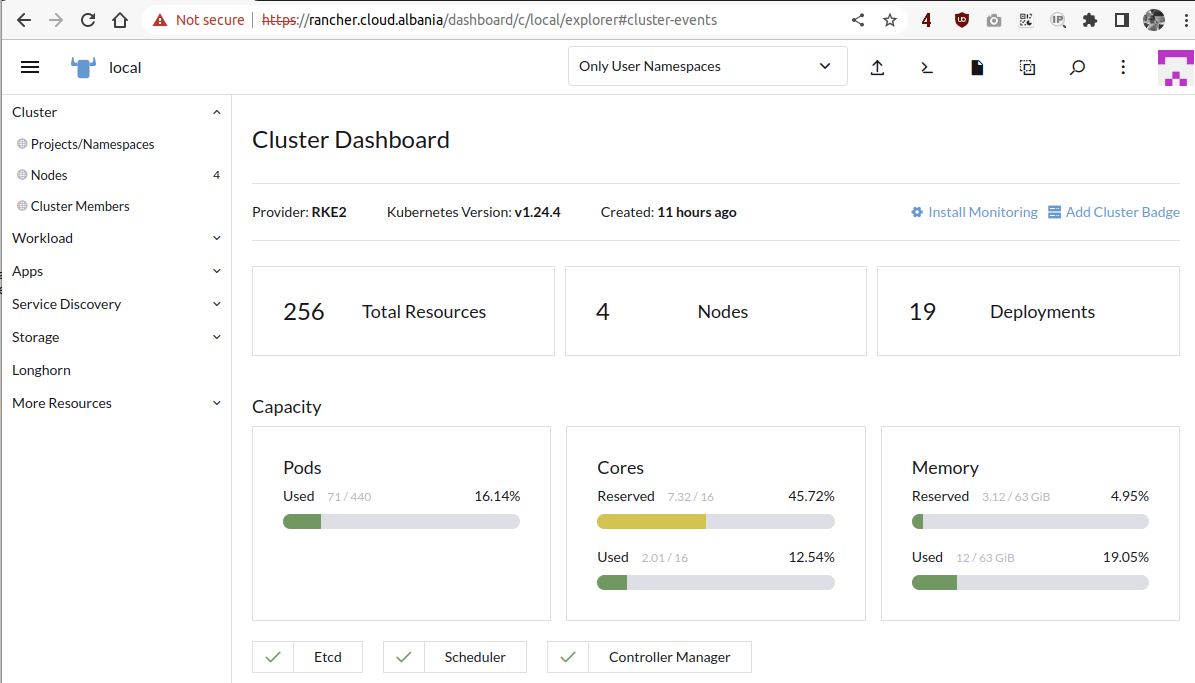
And after accepting the terms and conditions we are going to access the main dashboard listing the clusters managed by this Rancher instance. Notice that Rancher is a multi-cluster management tool so you can basically use it to connect to another existing cluster. Here is the documentation on importing other clusters.
Longhorn
As per their website, Longhorn is a cloud native distributed block storage for Kubernetes. Read in their documentation website for more understanding on how Longhorn works. We are going to use this storage provider for our pods and Longhorn will take care that the PVC can use this storage class.
Longhorn Install
There are different ways to install Longhorn but since we have Helm already installed we are going to use it for the install process.
# get the Longhorn repo chart
$ helm repo add longhorn https://charts.longhorn.io
"longhorn" has been added to your repositories

# update the repositories
$ helm repo update
Hang tight while we grab the latest from your chart repositories...
...Successfully got an update from the "longhorn" chart repository
...Successfully got an update from the "jetstack" chart repository
...Successfully got an update from the "rancher-latest" chart repository
Update Complete. ⎈Happy Helming!⎈

# finally install Longhorn
$ helm upgrade -i longhorn longhorn/longhorn --namespace longhorn-system --create-namespace
Release "longhorn" does not exist. Installing it now.
W0922 20:41:05.545061   81306 warnings.go:70] policy/v1beta1 PodSecurityPolicy is deprecated in v1.21+, unavailable in v1.25+
W0922 20:41:05.988189   81306 warnings.go:70] policy/v1beta1 PodSecurityPolicy is deprecated in v1.21+, unavailable in v1.25+
NAME: longhorn
LAST DEPLOYED: Thu Sep 22 20:41:03 2022
NAMESPACE: longhorn-system
STATUS: deployed
REVISION: 1
TEST SUITE: None
NOTES:
Longhorn is now installed on the cluster!

Please wait a few minutes for other Longhorn components such as CSI deployments, Engine Images, and Instance Managers to be initialized.

Visit our documentation at https://longhorn.io/docs/
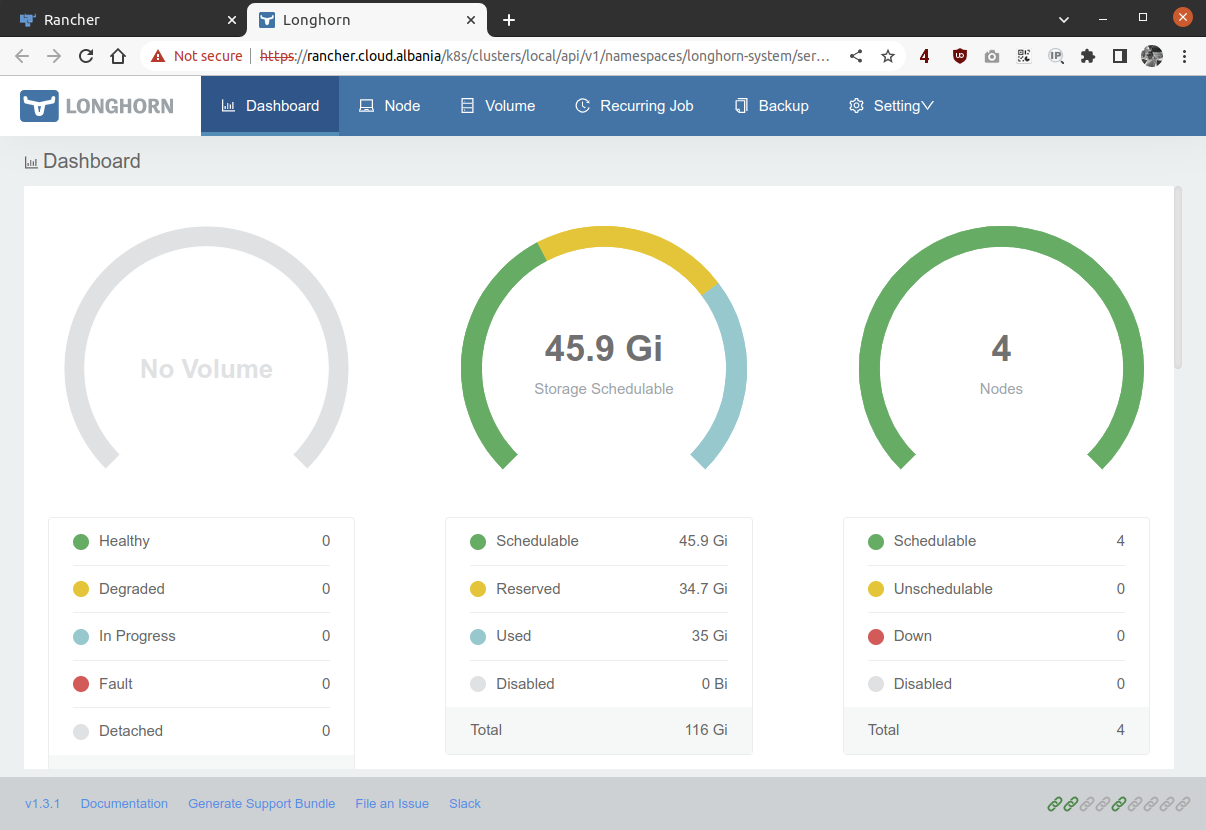
Now Rancher is smart enough to add the Rancher tab on the side and the capabilities to enter the Longhorn GUI straight from the Rancher one.
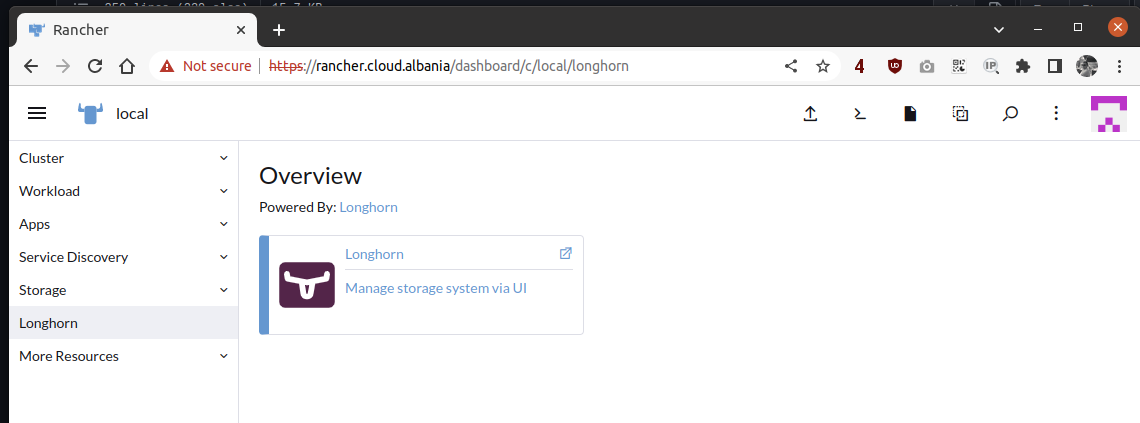
And the Longhorn GUI will look like this