Build your own Wireguard VPN server
Table of Content
Introduction
Last year had to help a friend build a Wireguard VPN server and while I was working on that project I had the idea to automate the setup process. I initially started to write a bash script on a VPS server with CentOS 7 server but in time wanted to also keep my skills up to date and decided to extend the scope to other OSes and releases.
In this article I also wanted to share how to build a cheap and if possibly free VPN server that you can connect from your PC (Laptop) or from your mobile phone.
This can be easily done with either the 1 year free AWS tier or with a free Oracle Cloud VPS server. After creating a free account in the links above you can then create a free VPS server. Note: If you try to run this on a new AWS EC2 instance it will fail. To make it work you have to create the VM without a public IP at first and then add a new Elastic IP later, see this guide.
Project Repository
The source code and documentation of the project is in GitHub and available for everyone to use.
It consists of a wg-install.sh script to install the server and a wg-remove.sh one to remove the server configurations and modifications (clean-up).
This script was tested on these OSes:
- Ubuntu (18.04 and 20.04)
- Debian (10, 11)
- CentOS (7, 8)
- Rocky Linux 8
- Amazon Linux 2
Step by step instructions
Wireguard server install
For these step by step instructions I am choosing a CentOS 7 server. This choice was random and any cloud provided VPS with a public IP can be used.
After login on your server, as root you can download the install script with
[root@localhost ~]# curl https://raw.githubusercontent.com/besmirzanaj/wg-install/master/wg-install.sh -s -O wg-install.sh
[root@localhost ~]# ll
total 12
-rw-r--r--. 1 root root 8853 Jan 21 22:28 wg-install.sh
You should read and check the content of the script before you run it to become more familiar with the installation steps. You can then start the install process. Assuming my public IP at that time was 45.56.67.78:
[root@localhost ~]# bash wg-install.sh
[i] OS: CentOS 7
Enter the name of the WAN network interface ([ENTER] set to default: eth0): <ENTER>
Which DNS do you want to use with the VPN?
   1) Cloudflare
   2) Google [Default]
   3) OpenDNS (has phishing protection and other security filters)
   4) Quad9 (Malware protection)
   5) AdGuard DNS (automatically blocks ads)
[?] DNS (1-5)[1]: 1 <ENTER>
[i] Installing Wireguard package and its depencencies
...
...
...
Complete!
[i] Installed Wireguard package and its depencencies

net.ipv4.ip_forward = 1
net.ipv4.conf.all.forwarding = 1
net.ipv6.conf.all.forwarding = 1
Loaded plugins: elrepo, fastestmirror
Loading mirror speeds from cached hostfile
 * base: centos.mirror.vexxhost.com
 * elrepo: ord.mirror.rackspace.com
 * epel: ftp-chi.osuosl.org
 * extras: centos.mirror.vexxhost.com
 * updates: mirror.dst.ca
[elrepo]: 52 kmod packages excluded due to dependency errors
Package firewalld-0.6.3-13.el7_9.noarch already installed and latest version
Nothing to do
success
success
success
success
Created symlink from /etc/systemd/system/multi-user.target.wants/wg-quick@wg0.service to /usr/lib/systemd/system/wg-quick@.service.
[+] Your first client config is saved at -> /root/client-wg0.conf

[+] You can use your mobile device to scan the above barcode.
[+] The Wireguard VPN server is up and running. Enjoy your fresh VPN installation! :^)
[+] To add more client configs run the same script again and enter the client config name.
The Wireguard VPN server is now installed and running. Your first client configuration file was generated as both in a QR encoded format and also as a file /root/client-wg0.conf that you can copy paste on your client.
Troubleshooting
Check on the server first if the kernel module for wireguard is installed. Expect the three lines (2 if you have disabled ipv6 at boot) in the command output below. If the output is empty then try to reboot the server. If the output is still empty then the install did not go as intended.
[root@localhost ~]# lsmod | grep wire
wireguard             189442  0
ip6_udp_tunnel         12755  1 wireguard
udp_tunnel             14423  1 wireguard
Then check the service if it is up and running. The service name was printed during install as wg-quick@wg0.service
[root@localhost ~]# systemctl status wg-quick@wg0.service
● wg-quick@wg0.service - WireGuard via wg-quick(8) for wg0
   Loaded: loaded (/usr/lib/systemd/system/wg-quick@.service; enabled; vendor preset: disabled)
   Active: active (exited) since Fri 2022-01-21 22:34:48 EST; 21min ago
     Docs: man:wg-quick(8)
           man:wg(8)
           https://www.wireguard.com/
           https://www.wireguard.com/quickstart/
           https://git.zx2c4.com/wireguard-tools/about/src/man/wg-quick.8
           https://git.zx2c4.com/wireguard-tools/about/src/man/wg.8
  Process: 24386 ExecStart=/usr/bin/wg-quick up %i (code=exited, status=0/SUCCESS)
 Main PID: 24386 (code=exited, status=0/SUCCESS)

Jan 21 22:34:48 localhost.localdomain systemd[1]: Starting WireGuard via wg-quick(8) for wg0...
Jan 21 22:34:48 localhost.localdomain wg-quick[24386]: [#] ip link add wg0 type wireguard
Jan 21 22:34:48 localhost.localdomain wg-quick[24386]: [#] wg setconf wg0 /dev/fd/63
Jan 21 22:34:48 localhost.localdomain wg-quick[24386]: [#] ip -4 address add 10.9.0.1/24 dev wg0
Jan 21 22:34:48 localhost.localdomain wg-quick[24386]: [#] ip link set mtu 1420 up dev wg0
Jan 21 22:34:48 localhost.localdomain wg-quick[24386]: [#] iptables -A FORWARD -i wg0 -j ACCEPT; iptables -A FORWARD -o wg0 -j ACCEP...ERADE;
Jan 21 22:34:48 localhost.localdomain systemd[1]: Started WireGuard via wg-quick(8) for wg0.
Hint: Some lines were ellipsized, use -l to show in full.
You can also check the output of the wg command to verify the wireguard server status:
[root@localhost ~]# wg
interface: wg0
  public key: 3m+61Bov2HBidrjg3K+XGem0MTfwO6RhhCpx59Y79Fc=
  private key: (hidden)
  listening port: 55439

peer: Awa0p6VrrPPq0l1F4e+a+1k3Mc0O5KT6IwTg3NmyphQ=
  allowed ips: 10.9.0.3/32
Client Setup
Now that the server is up and running it is time to configure our VPN client.
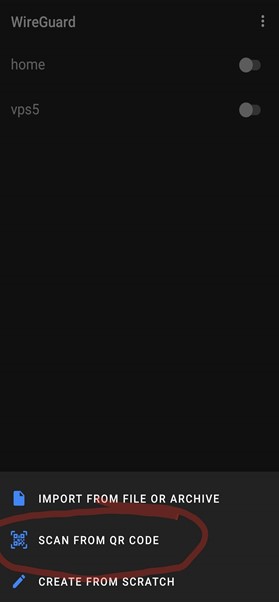
Mobile phone VPN client setup
Download the official Wireguard VPN client for your mobile phone:
Start the client and select Scan from QR code to scan the QR code generated above.
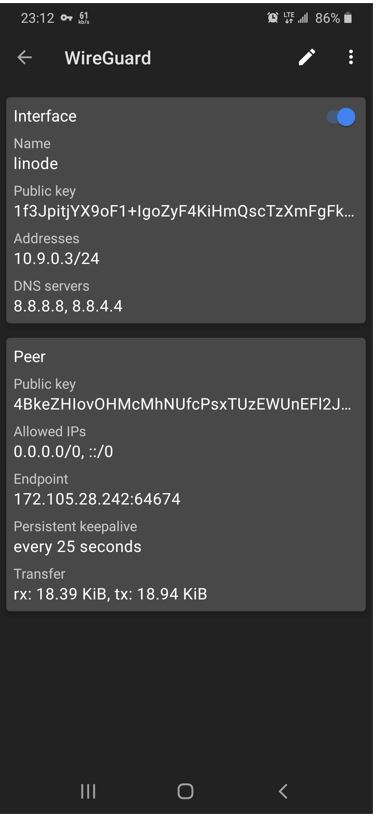
After the tunnel has been imported you can now connect and confirm a successful connection as shown below.
Windows desktop client
Now that we already have the client configuration created at /root/client-wg0.conf , we can copy its content on our Windows Wireguard VPN client.
Let’s get the content of the VPN client config
[root@localhost ~]# cat client-wg0.conf
[Interface]
PrivateKey = SD3BI2/nJfC198sV1FVCgAozm3nTvC6wQk41vYcnqkA=
Address = 10.9.0.3/24
DNS = 1.1.1.1,1.0.0.1
[Peer]
PublicKey = 3m+61Bov2HBidrjg3K+XGem0MTfwO6RhhCpx59Y79Fc=
AllowedIPs = 0.0.0.0/0, ::/0
Endpoint = 45.56.67.78:55439
PersistentKeepalive = 25
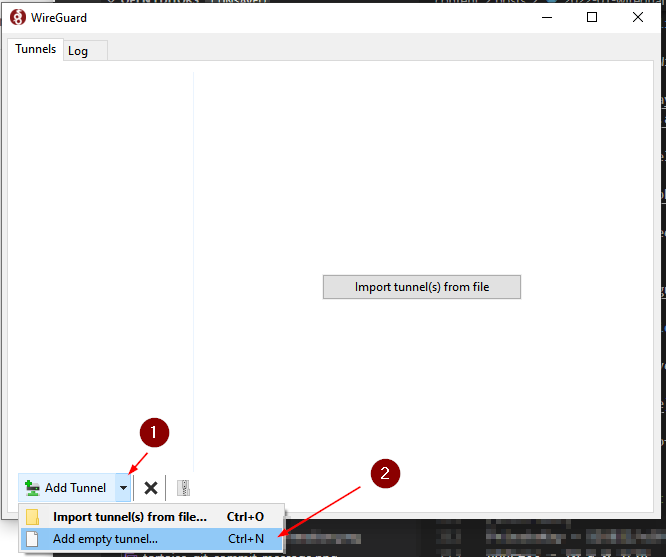
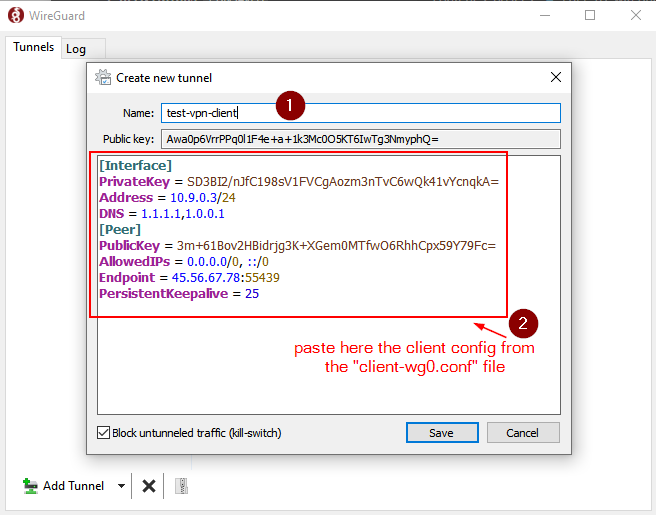
We can copy this client config content over the Windows client as shown in the steps below. First click the drop-down arrow at “Add tunnel” and then select “Add empty tunnel…” or just enter Ctrl+N in your keyboard.
In the “Create new tunnel” window name your tunnel (any name would do) and paste the client code we got from the server as shown here
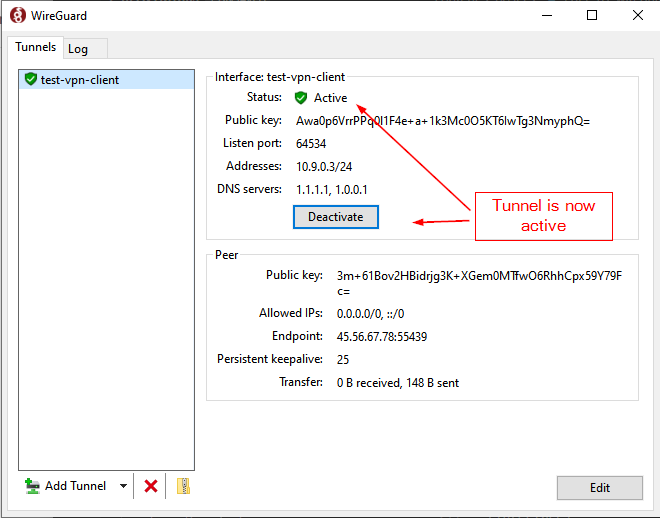
After saving the VPN profile, we will have a VPN tunnel config ready available to us
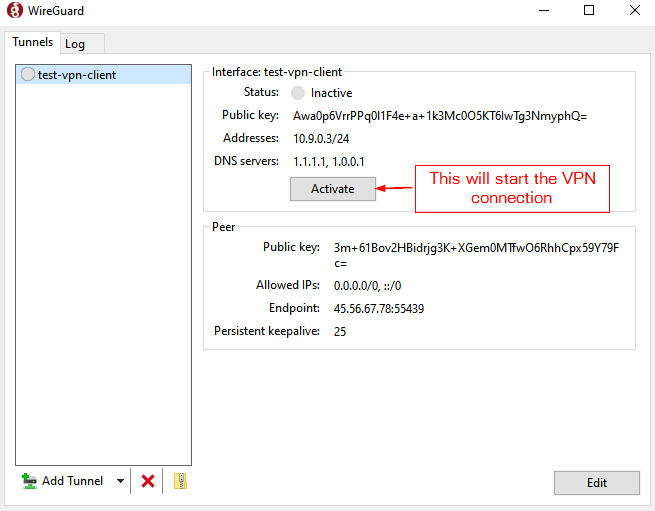
At this point we can just “Activate” the VPN connection and our system will be establish a VPN connection with our VPS server. All traffic between us and the VPS server will be encrypted and remote servers will see our traffic as originated from the VPS servers’s public IP address noted in the Peer -> Endpoint section of the window.