Automating my Homelab - Part 1 - Building VM templates with Packer
Table of Content
- Table of Content
- Homelab Infrastructure
- Packer image building
- Packer project repository
- Building images
- Things that I spent more time
- Results
Last year I started to seriously master my Kubernetes (k8s) knowledge and I was lucky to get a promo code for 50% off from the CKA exam. At the same time , working with IT infrastructure systems, I really wanted to learn and deploy a PROD level environment at work for our teams to use.
As with any new technology (at least for me) and coming from a traditional infrastructure background (think datacenters, servers, storage systems, VMware, Linux, Puppet and Ansible), I just could not be satisfied with the ready to use k8s managed instances from the cloud providers (GKE, EKS, AKS, etc.) from a learning perspective. I needed to build the thing myself.
The pain points for me after reading some high level architecture of k8s were how all elements were linked together, how to properly install and automate the setup process for future builds and understand better the tooling. The yaml k8s declarative files were not helpful so far to me and the minikube tutorial was useless at this point.
In the meantime I had started the Mumshad Mannambeth’s Certified Kubernetes Administrator course.
So the need: create infrastructure to quickly and automatically build/destroy/rebuild my test k8s environment. Since I have a small homelab already, it would make sense to use the local resources at home which are more than enough (~192 Gb RAM, 24 Cores, and 1Tb NFS Storage) for learning purposes.
Homelab Infrastructure
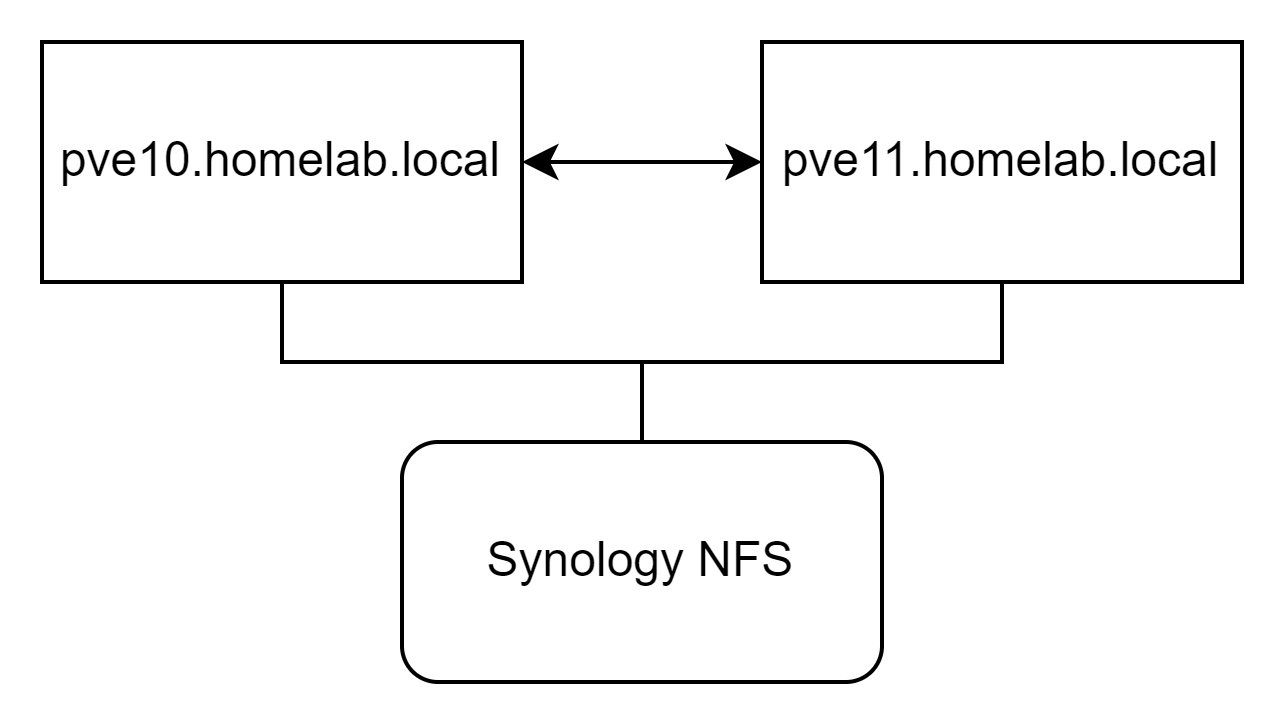
My homelab consists of two nodes each with Proxmox VE hypervisor and part of a local cluster. The Storage backend is a Synology NAS providing NFS storage resources.
One of the best things about Proxmox is the fact that it offers an API that you can automate most of the tasks.
Here is where Packer enters the scene.
Packer image building
Automating the creation of the k8s resources involves the fast creation of VMs that are going to host the different k8s roles, such as master, worker and etcd. As per best practices the ideal approach is to use ready available images in your infrastructure that can be spawn at any time, basically following the same concept as the main cloud providers are doing. At the time of preparing this article, I was focused on building Rocky Linux 8 and Ubuntu 18.04 images.
One of the best VM imaging tools in the market is Packer and for this project I am going to use the Packer Proxmox Builder plugin for this purpose. Initially tried to build using this article (and others that were using the proxmox-clone) but I found out it had to be done in a two step process: One to download a ready to use cloud-image and the other to clone this image, install cloud-init and then save as a template. This does not sound like an elegant solution to me. I like things to be simple and opted to spend a bit more time to have a single process (pipeline) for image builds.
Packer project repository
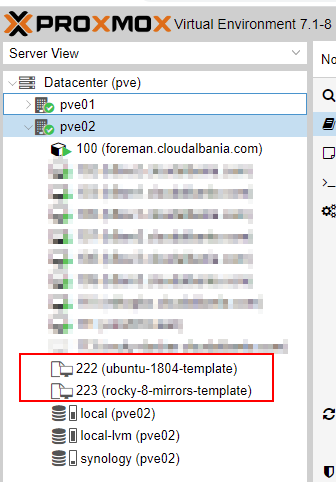
The repository of this project is stored at https://gitlab.com/cloudalbania/packer-proxmox-lab. This repository contains 3 main templates: two for Rocky Linux 8 and another one for Ubuntu 18.04.
templates/ubuntu_1804_proxmox.json- This template mounts a local Ubuntu 18.04 Server ISO file and installs packages from the ISO. It then updates packages as one of the last steps of OS install. If you want ot dive a bit more on preseed file building, the official Ubuntu documentation is a great place to start.templates/rocky8_proxmox_mirrors.json- This template will boot a minimal boot Rocky Linux ISO and then will be instructed to use a kickstart that will pull install files (RPMs) from public Rocky Linux mirrors.templates/rocky8_proxmox_foreman.json- This template will also boot the minimal boot ISO of Rocky Linux 8 but instead will use my local Foreman repositories for package installation. I am using this for my homelab as it is much faster than waiting to download the install RPMs from internet.
Secrets management
Proxmox and the newly built VMs need credentials to allow Packer to login and run the templates. So after cloning the repo you need to add a secrets.json file in the root path of the repo with the following structure:
$ cat ./secrets.json
{
    "ssh-password": "templates_ssh_password",
    "proxmox-url": "https://server01.homelab.com:8006/api2/json",
    "proxmox-node": "server01",
    "proxmox-username": "eg_root@pam",
    "proxmox-password": "proxmox_pass"
}
where:
ssh-passwordis the same password you have configured in the kickstart or the preseed fileproxmox-urlis the api URL of one of the Proxmox nodesproxmox-nodeis the node where the build will take placeproxmox-usernameis the login for your proxmox instanceproxomox-passwordis the password for the above login
Building images
Before runnig the packer template builds make sure to update the storage pool to match your own and also to upload the ISO file of your distribution so that the builder can mount it. Uploading the ISO files and preparing the storage backed for Proxmox is out of scope of this article.
As per the kickstart files themselves I chose ot host them both locally in my repo at ./kickstarts folder and also publish in a publicly accessible place such as http://ks.cloudalbania.com.
Once the repo is ready and Packer is installed you can run the build wrapper scripts in the ./scripts folder. For Ubuntu 18.04 I use:
bash ./scripts/ubuntu1804_proxmox.sh
and for Rocky Linux 8 I use:
bash ./scripts/rocky8_proxmox_mirrors.sh
# or this if using my local repos:
bash ./scripts/rocky8_proxmox_foreman.sh
These wrappers scripts will make sure to delete the existing template if present (we want to clean up old templates before building a new one) and then run packer build.
The reason we are deleting the existing template VM manually is that the current Packer plugin for Proxmox is still not able to use the --force option to do this for us.
The Packer build process will boot a minimal 5 Gb VM and mount the ISO file on them. After the OS has booted it will enter the boot commands and will specify which kickstart file to use for the rest of the automated installation depending on the OS being installed.
The reason I am using a small 5 Gb VM for templates is to have faster VM provisioning times later with Terraform. Each new VM will be cloned from this template disk, so the smaller, the faster VM creation time will be.
Ubuntu
The content of the wrapper script for the Ubuntu image is below. This script will validate the packer template first and then if successful will continue with the build, otherwise it will exit without any changes.
$ cat ./scripts/ubuntu1804_proxmox.sh

#!/bin/bash

TEMPLATE="templates/ubuntu_1804_proxmox.json"
VAR_FILE="secrets.json"

PACKER_TEMPLATE_VALIDATION=$(packer validate --var-file=$VAR_FILE $TEMPLATE)

if [[ ${PACKER_TEMPLATE_VALIDATION} == "The configuration is valid." ]] ; then
    echo "[i] Packer template syntax validation successful"
    echo "[i] Building the VM template"
    ssh root@pve02.cloudalbania.com  "qm destroy 224 --skiplock"
    PACKER_LOG=1 packer build --force --var-file=$VAR_FILE $TEMPLATE
else
    echo "[X] Packer template syntax validation failed"
fi
The full Ubuntu 18.04 packer template is shown below. Notice the preseed file in the boot_command section.
{
  "builders": [
    {
      "type": "proxmox-iso",
      "vm_id": "222",
      "node": "{{ user `proxmox-node`}}",
      "proxmox_url": "{{ user `proxmox-url`}}",
      "username": "{{ user `proxmox-username`}}",
      "password": "{{user `proxmox-password`}}",
      "iso_file": "{{ user `iso_url` }}",
      "iso_checksum": "sha256:{{ user `checksum` }}",
      "insecure_skip_tls_verify": "true",
      "vm_name": "{{ user `vm-name` }}",
      "cores": "{{ user `vm-cpu-num` }}",
      "memory": "{{ user `vm-mem-size` }}",
      "os": "l26",
      "network_adapters":
        [
          {
            "model": "virtio",
            "bridge": "vmbr1",
            "firewall": false
          }
        ],
        "boot_command": [
          "<enter><wait><f6><wait><esc><wait>",
          "<bs><bs><bs><bs><bs><bs><bs><bs><bs><bs>",
          "<bs><bs><bs><bs><bs><bs><bs><bs><bs><bs>",
          "<bs><bs><bs><bs><bs><bs><bs><bs><bs><bs>",
          "<bs><bs><bs><bs><bs><bs><bs><bs><bs><bs>",
          "<bs><bs><bs><bs><bs><bs><bs><bs><bs><bs>",
          "<bs><bs><bs><bs><bs><bs><bs><bs><bs><bs>",
          "<bs><bs><bs><bs><bs><bs><bs><bs><bs><bs>",
          "<bs><bs><bs><bs><bs><bs><bs><bs><bs><bs>",
          "<bs><bs><bs>",
          "/install/vmlinuz",
          " initrd=/install/initrd.gz",
          " priority=critical",
          " locale=en_US",
          " preseed/url=http://ks.cloudalbania.com/preseed_1804.cfg ",
          "<enter>"
      ],
      "disks":
      [
        {
          "type": "virtio",
          "disk_size": "{{ user `vm-disk-size` }}",
          "storage_pool": "synology",
          "storage_pool_type": "lvm-thin",
          "format": "raw"
        }
      ],
      "scsi_controller": "pvscsi",
      "unmount_iso": "true",
      "template_name": "{{ user `vm-name` }}",
      "template_description": "Proxmox Ubuntu 18.04 packer image - built on {{isotime \"20060102-150405\"}}",
      "qemu_agent": "true",
      "ssh_password": "{{ user `ssh-password` }}",
      "ssh_username": "root",
      "ssh_timeout": "90m",
      "cloud_init": "true",
      "cloud_init_storage_pool": "synology"
    }
  ],
  "provisioners": [
    {
      "type": "ansible",
      "playbook_file": "./ansible/playbook.yml"
    },
    {
      "type": "shell",
      "inline": [
        "echo '{{ user `vm-name` }} -- Packer Build Complete'"
      ]
    }
  ],

  "variables": {
    "iso_checksum": "8c5fc24894394035402f66f3824beb7234b757dd2b5531379cb310cedfdf0996",
    "iso_url": "local:iso/ubuntu-18.04.5-server-amd64.iso",
    "vm-cpu-num": "2",
    "vm-disk-size": "5G",
    "vm-mem-size": "2048",
    "vm-name": "ubuntu-1804-template"
  }
}
After the build is complete we should get an output similar to this:
$ bash ./scripts/ubuntu1804_proxmox.sh
...
...
==> Wait completed after 11 minutes 22 seconds
==> Builds finished. The artifacts of successful builds are:
==> Wait completed after 11 minutes 22 seconds
==> Builds finished. The artifacts of successful builds are:

real    11m26.269s
user    0m15.969s
sys     0m29.969s
Rocky Linux
I will focus on the Rocky Linux template that is using public repositories to build as that is a more generic approach that the reader can use without much customization. The content of the wrapper script for the Rocky Linux image is below. The same as with the Ubuntu one, this script will validate the packer template first and then if successful will continue with the build, otherwise it will exit without any changes.
$ cat ./scripts/rocky8_proxmox_mirrors.sh
#!/bin/bash

TEMPLATE="templates/rocky8_proxmox_mirrors.json"
VAR_FILE="secrets.json"

PACKER_TEMPLATE_VALIDATION=$(packer validate --var-file=$VAR_FILE $TEMPLATE)

if [[ ${PACKER_TEMPLATE_VALIDATION} == "The configuration is valid." ]] ; then
    echo "[i] Packer template syntax validation successful"
    echo "[i] Building the VM template"
    ssh root@pve02.cloudalbania.com  "qm destroy 224 --skiplock"
    PACKER_LOG=1 packer build --force --var-file=$VAR_FILE $TEMPLATE
else
    echo "[X] Packer template syntax validation failed"
fi
The full Rocky Linux 8 packer template is shown below. Notice the kickstart file in the boot_command section.
{
    "builders": [
        {
          "type": "proxmox-iso",
          "vm_id": "223",
          "node": "{{ user `proxmox-node`}}",
          "proxmox_url": "{{ user `proxmox-url`}}",
          "username": "{{ user `proxmox-username`}}",
          "password": "{{user `proxmox-password`}}",
          "iso_file": "{{ user `iso_url` }}",
          "iso_checksum": "sha256:{{ user `checksum` }}",
          "insecure_skip_tls_verify": "true",
          "vm_name": "{{ user `vm-name` }}",
          "cores": "{{ user `vm-cpu-num` }}",
          "memory": "{{ user `vm-mem-size` }}",
          "os": "l26",
          "boot_command": [
            "<esc><wait>",
            "linux inst.ks=http://ks.cloudalbania.com/rocky8_mirrors_vda.cfg<enter>"
          ],
          "disks":
          [
            {
              "type": "virtio",
              "disk_size": "{{ user `vm-disk-size` }}",
              "storage_pool": "synology",
              "storage_pool_type": "lvm-thin",
              "format": "raw"
            }
          ],
          "scsi_controller": "pvscsi",
          "network_adapters":
            [
              {
                "model": "virtio",
                "bridge": "vmbr1",
                "firewall": false
              }
            ],
          "ssh_password": "{{ user `ssh-password` }}",
          "ssh_username": "root",
          "unmount_iso": "true",
          "template_name": "{{ user `vm-name` }}",
          "template_description": "Proxmox Rocky Linux 8 packer image - built on {{isotime \"20060102-150405\"}}",
          "qemu_agent": "true",
          "ssh_timeout": "90m",
          "cloud_init": "true",
          "cloud_init_storage_pool": "synology"
        }
      ],
      "provisioners": [
        {
          "type": "ansible",
          "playbook_file": "./ansible/playbook.yml"
        },
        {
          "type": "shell",
          "inline": [
            "echo '{{ user `vm-name` }} -- Packer Build Complete'"
          ]
        }
    ],

    "variables": {
      "iso_checksum": "5a0dc65d1308e47b51a49e23f1030b5ee0f0ece3702483a8a6554382e893333c",
      "iso_url": "local:iso/Rocky-8.5-x86_64-boot.iso",
      "vm-cpu-num": "4",
      "vm-disk-size": "5G",
      "vm-mem-size": "4096",
      "vm-name": "rocky-8-mirrors-template"
    }
  }
$ bash ./scripts/rocky8_proxmox_mirrors.sh
...
...
==> Wait completed after 16 minutes 3 seconds
==> Builds finished. The artifacts of successful builds are:
==> Wait completed after 16 minutes 3 seconds
==> Builds finished. The artifacts of successful builds are:

real    16m7.092s
user    1m10.547s
sys     2m37.078s
Things that I spent more time
This was not a walk in the park kind of project as I faced several issues during the preparation of the templates and finding some documentation. Issues from making the VM ready for cloud-init to tell Terraform to extend the root disk had to be considered.
Disk configuration
After trial and error and also comparing with major IaaS providers it made sense to use the VMware SCSI controller (pvscsi) with virtio disk and network adapters. pvscsi allows to add one or more devices to the scsi bus and virtio is the defacto standard for cloud images. The HDD device will appear as a /dev/vda device in your VM.
To allow Terraform to extend the root disk automatically I placed an autogrow disk script in the images during build time so that it can be run during provisioning time to extend the root lv to the full free partition space from the initial 5Gb.
Cloud-init
Proxmox allows you to build a VM with Cloud-init support. It does this by creating a local cdrom device drive where you can place customizations during build time. From the official Proxmox documentation this process is not very clear how it can be done during image building. What we need to do is to just create this drive and leave it empty. It will be filled with customization data during provisioning time later from Terraform.
Cloud-init, while running as a service in the new VMs, will pick up the content of this drive and customize the VM. This is also part of the packer plugin capabilities that allowed me to have all of the build process in a single run.
Understanding the boundaries of where Packer’s job ends and Terraform’s begin was where I spent most of the time as I wanted to make sure the process worked in later phases when we will spawn VMs.
Results
These Packer templates are now ready to deliver new VMs on my Proxmox cluster that I will use in later steps.